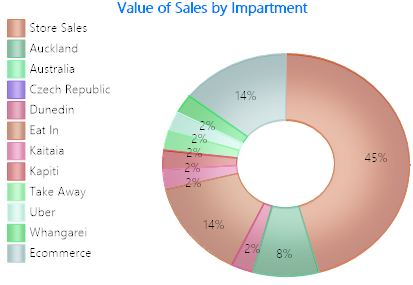
Retail Sales Processing
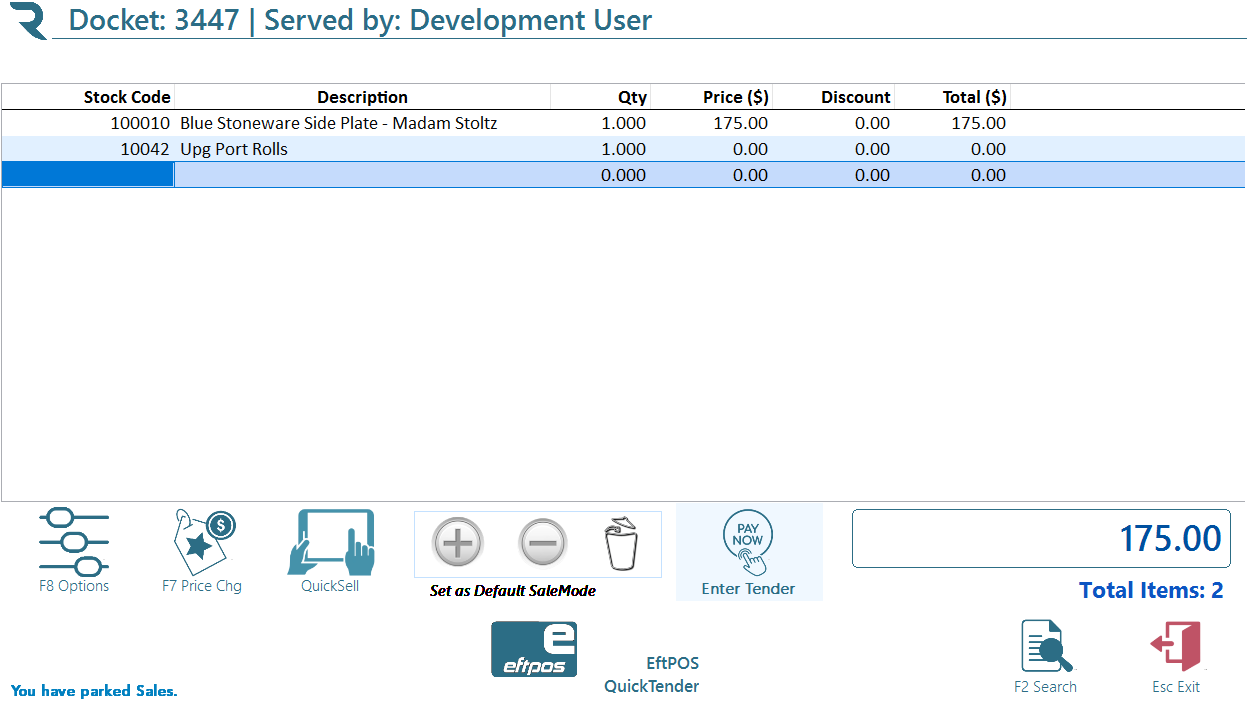
To sell an item simply enter the stock code , scan the barcode or press <F2> to search for an item (see F2 - Search in this manual). Once entered the system will verify that the code is correct and bring up the description, unit price and if available a picture of the item. Note there is none in stock of this item you will be asked to verify the item.
Enter the quantity being sold (the total field will reflect the amount entered). The system will return to the next line where you may either enter another code or press enter to advance to the payment screen.
note if the item you are selling is in a current promo the system will use the promotion price and display the promo name.
Quick Keys
 Once an item has been scanned you can use these keys with your mouse, or if you have a touch screen, your finger to Increase/Decrease the Quantity or delete a line.
If the current selected line is blank this operation will occur on the previous line scanned.
QuickSell
You may switch backwards and forwards between the retail and QuickScreen as you wish. Both screens have a "Set as Default SaleMode". Click this to set the current sales screen as the default (you will still be able to cycle back and forth between Screens)
Items with Disclaimers
If an item has one or more disclaimers loaded against it the system will display these as soon as you enter the stockcode. You MUST make the customer aware of these disclaimers. If they have been set up to do so these will also print on the sales docket.
Sales requiring Authorisation
Some items require a level of security to sell if so and your level does not reach this security the salesperson entry screen will pop up asking for the user code and password of a user with the required level.
Entering serial or warranty numbers
Some items will require that a serial number or warranty number is recorded. If so you will be asked for the number - this will be recorded with the sale
This number will print on the sales docket and be recorded in the system.
You may reprint this docket at any time by entering the serial/warranty number in the docket reprint screen (See Reprint a Docket)
Sales Returns
If you need to return an item the process is the same as a sale except the qty will be a negative ie -1 (note if your POS is in express mode you will have to arrow up to change the qty as by default 1 will be entered).
You will be asked for the code of the person who made the original sale and if valid the person who assisted.The system will pop up the return screen
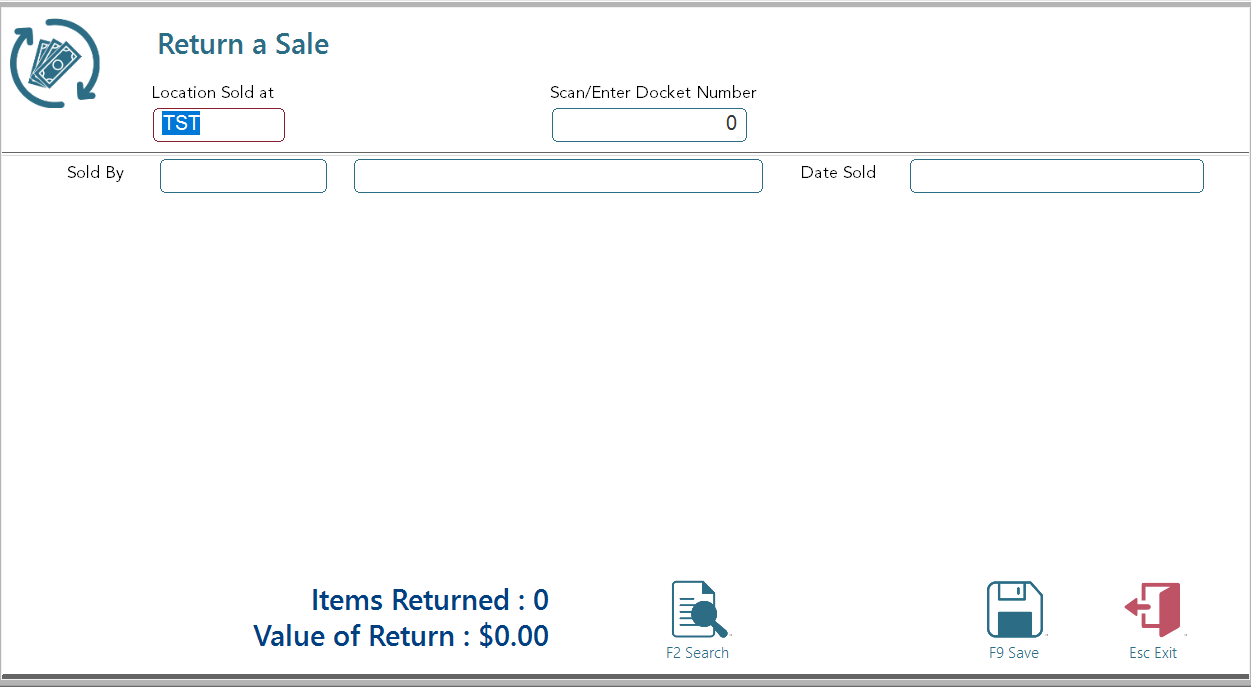
By default the system will look to the local database, if the sale is from another store enter the store code (You may search using the standard search function).
- Scan/Enter the sales docket number you are returning
- The sold be and Date sold will fill for you confirming the docket was found
- Select a return reason - these have been defined for you.
- At times if required the return reason may ask extra information
This information is not mandatory and if you do not have them press <Alt-S> to continue the return docket will print..
Note - if you use "Co Cheque" (Company cheque) as the return method of payment the system will ask for the cheque number. This will be stored with the payment record.
F8 - Options Sales Options
All sales functions are available from here. This provides easy access to advanced sale options without a myriad of different key combinations to memorise.
For more information on sales options see here.
F7 - Change Price

This takes you directly to the price change screen bypassing the F8 Menu. For full discounting option see here
Tendering payment types

Continue to the payments screen by one of the following methods
- Pressing <Enter> on a blank stock code
- Clicking on the Tender button with the mouse or your finger on a touch screen.
If you have pressed <Enter> by mistake pressing <Esc> will return you to the sales entry screen.
EftPOS Quicktender
This button will advance to the tender screen and process the sale as eftPOS saving you several Keystrokes
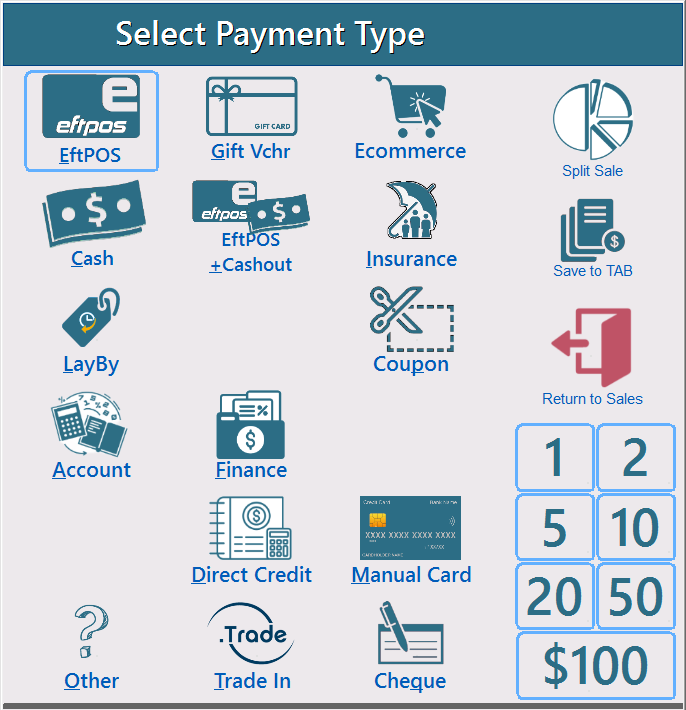
A sales docket may be paid for by multiple tenders i.e. some on EFTPOS, some on Cash and the rest as Cheque.
To select a payment type
- use the <arrow> key to navigate to the desired type
- press the first letter of the type (note "A" will locate "Amex", press "A" again to locate "Account".
- Press the option desired with your finger
Press enter on the desired type and you will be advanced to the amount field, If the POS fast mode is turned on this will be pre-filled with the amount otherwise you will have to enter the amount left on the sale. Press enter to accept otherwise enter the amount for this tender. If there is still an amount left to pay you will be returned to the payment type field for the next type. Payment types will be recorded in the amount to pay box.
For a list of Payment types see here
Automatic Gift Voucher Print
If this option is turned on the system will, when a club member qualifies print a gift voucher. The system will automatically register this Gift Voucher. For more information see Selling Gift Vouchers
Gift Receipts
If turned on the system will ask if you would like a gift receipt. select yes and a second receipt will be printed with the retails encoded.
Sales Questions
If turned on the system will ask a question from the customer. This question may be set by management, the answer is optional.
For example, tracking where your customers come from.
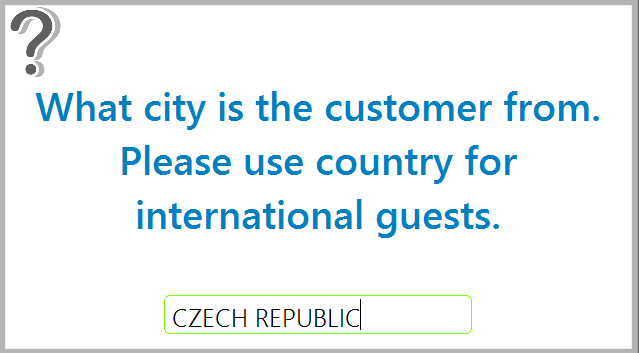
Results of this question are available on the daily rankings screen as well as various reports both in Head Office and POS.